One of the most coveted Jeeps of all time is a relatively low-volume, stretched version of the regular 1997 to 2006-generation Jeep Wrangler.
It’s called the Jeep Wrangler Unlimited. Let’s look at how this
elongated Wrangler combined key on-road and off-road traits to become a
legend in the Jeep community.
In America’s rockiest and muddiest
off-road circles, the 2004 to 2006 Jeep Wrangler is unanimously hailed
as an icon. To find out why, I dug through lots of literature and
interviewed owners and off-road experts. What I learned is that the
first-ever extended Wrangler offered a blend of on-road versatility and
off-road capability unmatched by any body-on-frame vehicle in the
history of Jeep. Read more...
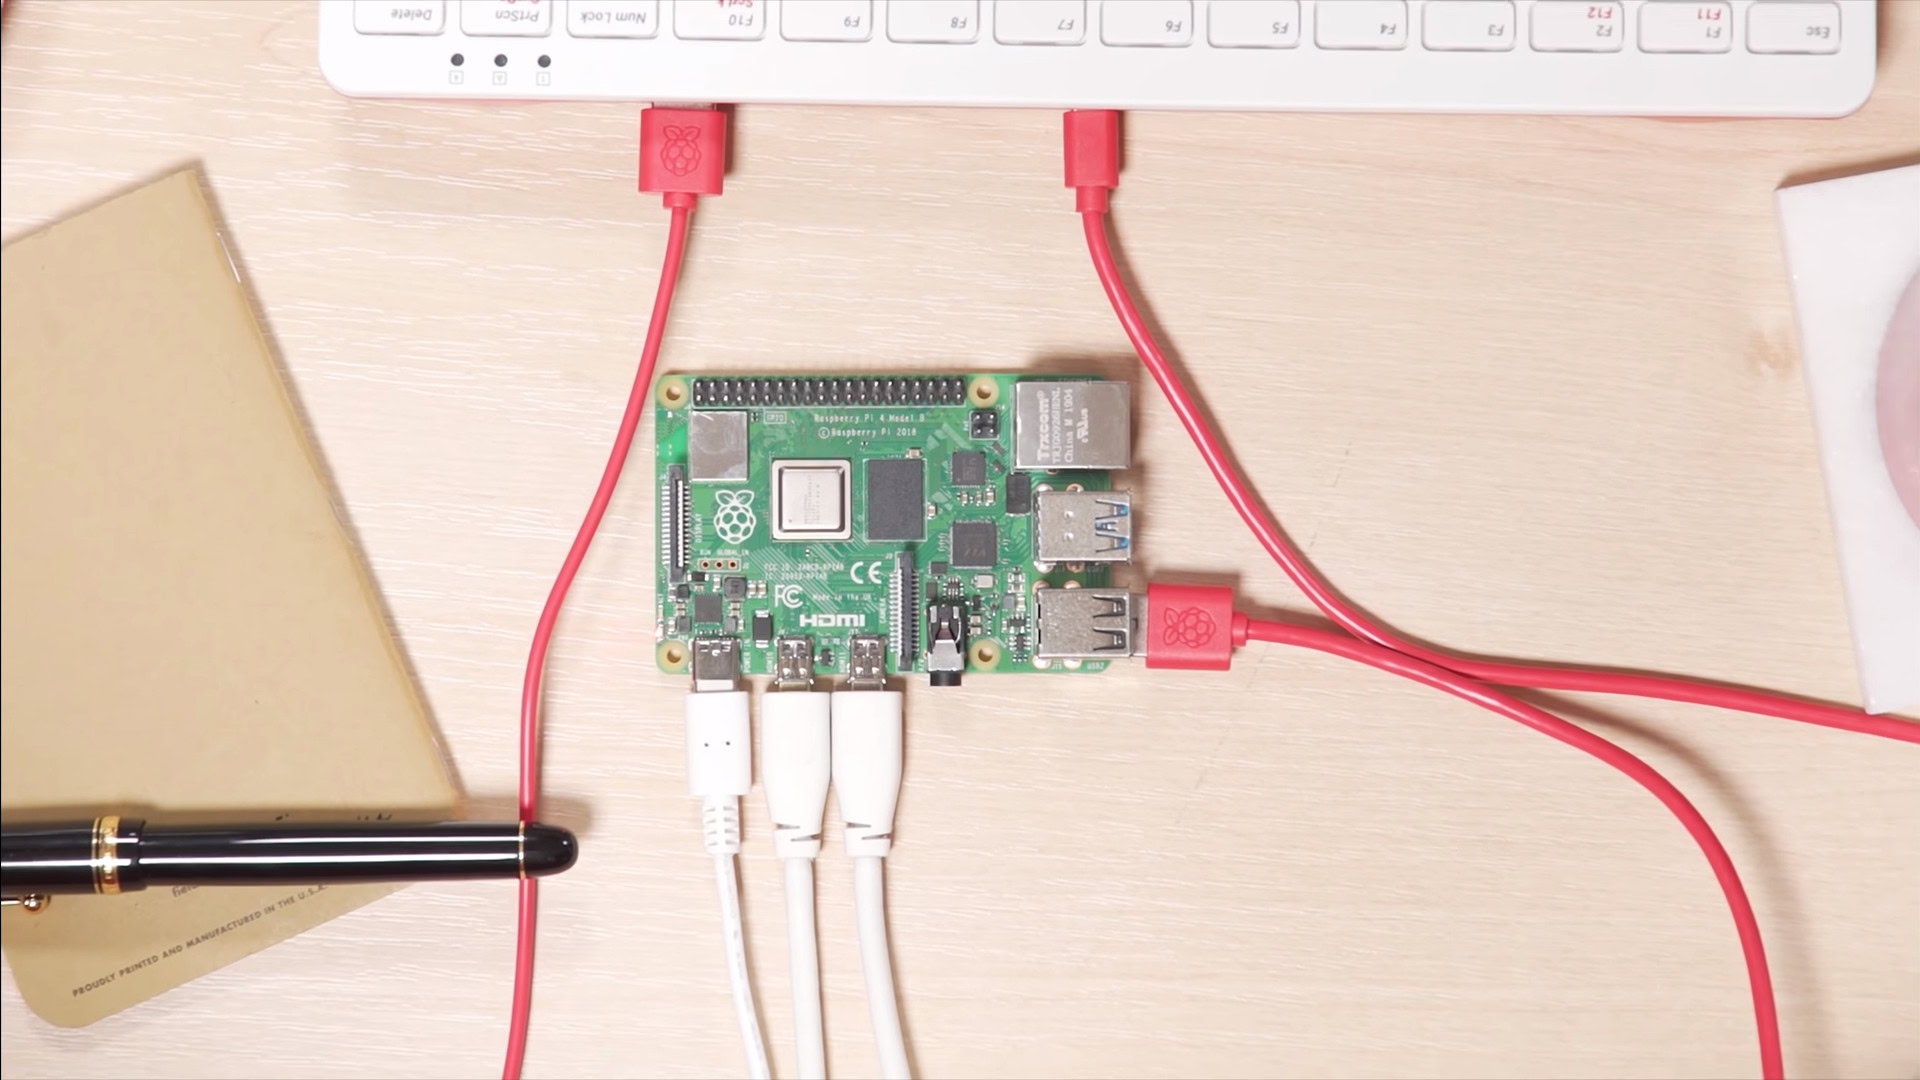
The Raspberry Pi 4 was announced on Monday, and it represents a massive leap in capabilities compared to previous models. It’s crazy to think the original model only had a single-core processor, 256MB of RAM, and one USB slot.
How
does the Raspberry Pi 4 fare on paper when compared to the previous
model? We’ve got you covered with our Raspberry Pi 4 vs Raspberry Pi 3
Model 3B+ rundown.
Horsepower
In
terms of sheer power, the Raspberry Pi 4 is a major step up from its
predecessor, offering four heavy lifting Cortex-A72 CPU cores compared
to the older model’s four Cortex-A53 cores. Read more...
Posted by Ken S. on April 16, 2019 in General Tech | ∞
The streets of
Davos, Switzerland, were iced over on the night of January 25, 2018,
which added a slight element of danger to the prospect of trekking to
the Hotel Seehof for George Soros’ annual banquet. The aged financier
has a tradition of hosting a dinner at the World Economic Forum, where
he regales tycoons, ministers, and journalists with his thoughts about
the state of the world. That night he began by warning in his quiet,
shaking Hungarian accent about nuclear war and climate change. Then he
shifted to his next idea of a global menace: Google and Facebook.
“Mining and oil companies exploit the physical environment; social
media companies exploit the social environment,” he said. “The owners of
the platform giants consider themselves the masters of the universe,
but in fact they are slaves to preserving their dominant position …
Davos is a good place to announce that their days are numbered.” Read more...
Sturdy chassis. Robust performance from the Intel Core i7 CPU.
Cons
Pricey as configured. Less than 10 hours of battery life in testing.
Bottom Line
The Dell Latitude 7389 is a business-oriented 2-in-1 laptop with a sturdy, if conventional, black chassis and solid Core i7 power. Its chief differentiator in a crowded market is disappointing battery life. Read more...
Posted by Ken S. on December 29, 2017 in General Tech | ∞
The GoPro Hero 6 is here. It’s new, it’s shiny, and it’s $100 more expensive than the old one. But is it worth the upgrade? The GoPro Hero 5 was something of a disappointment for many. Sure, it had built in waterproofing and touchscreen. But beyond those, it did really seem to offer all that much over the GoPro Hero 4 Black.
So how does the GoPro Hero 6 compare? This video, from the folks over at Vistek, puts the new Hero 6 head-to-head with its predecessor, the GoPro Hero 5 to see if it’s really worth upgrading.
Using an inexpensive Raspberry Pi system for remote network troubleshooting
Credit: Raspberry Pi
The Raspberry Pi is an amazing little inexpensive Linux-based computer. It has been remarkably successful and there have been over 1 million Raspberry Pi systems sold. The Raspberry Pi can also be a useful tool in conventional IT environments and can be an inexpensive way to perform remote network monitoring. In this article we cover how to get a Raspberry Pi up and going and how to configure it for network monitoring purposes. For less than $50 you can have a remotely accessible network device for testing and troubleshooting up and working in less than 30 minutes. Read more...
Since its release, the $35 Raspberry Pi mini-computer has been hailed as the perfect all-in-one retro game console. Now, it’s easier to do than ever, and it doesn’t take any Linux knowledge whatsoever. Here’s how to make your own retro game console in under 10 minutes.
Update (2/9/2017): We’ve updated this guide to reflect the changes in the newest version of RetroPie (currently 4.1). This includes entirely new sections for setting up your card, system, and controllers. Thankfully, the whole process is considerably easier now! If you’re just looking to update an older installation of RetroPie to the most recent version, start up RetroPie and head to the RetroPie Menu > Update, or follow this guide for more detailed instructions.Read more...
Travis Jeffery is a software developer who’s been using a database system called FoundationDB for a project at his startup. Earlier this week, he noticed that the software had been pulled from the web. He soon received a terse email confirming that the software had been taken down intentionally, but little else. “We have made the decision to evolve our company mission,” it read. “And as of today, we will no longer offer downloads.” Read more...


 Credit: Raspberry Pi
